아주 예전에 mediapipe를 사용하여 프로젝트를 진행한 적이 있는데 정리를 따로 하진 않고 링크만 덕지덕지 정리해 둔 노션 페이지를 보고 블로그에 제대로 정리를 해 두기로 마음 먹었다..!
mediapipe란?
https://github.com/google-ai-edge/mediapipe?tab=readme-ov-file
GitHub - google-ai-edge/mediapipe: Cross-platform, customizable ML solutions for live and streaming media.
Cross-platform, customizable ML solutions for live and streaming media. - google-ai-edge/mediapipe
github.com
이미지나 비디오 영상 등에 대해 inference를 할 수 있도록 pipeline 구축을 위한 framework이다.
구글에서 주로 인체를 대상으로 하여 얼굴, pose를 인식할 수 있도록 AI 모델 개발을 마친 상태로 제공되는 서비스이기 때문에 다양한 프로그램 언어에서 사용하기 편하게 라이브러리 형태로 모듈화 되어 제공되고 있다.
mediapipe의 장점
AI 모델을 통한 inference가 됨에도 불구하고 cpu 환경에서도 굉장히 빠르게 동작을 한다.
안드로이드, ios, 클라우드 IoT 등 다양한 환경에서도 사용이 가능하다.
Apache 2.0 프레임워크 및 솔루션을 제공하고 확장성이 좋다.

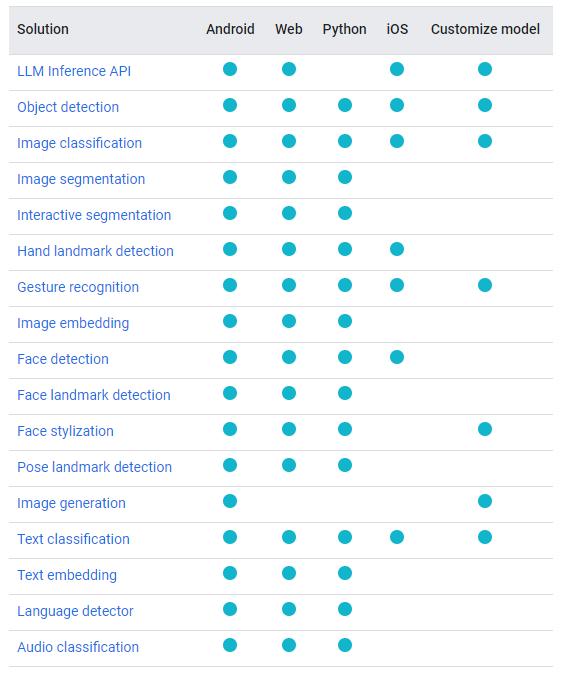
python으로 사용할 수 있는 솔루션은 위와 같다. (당시 사용할 때까지만 해도 LLM은 없었는데 몇년 사이에 생겨있어서 충격이었다 ㅋㅋㅋ)
mediapipe 사용
mediapipe를 사용하기 위해서는 pip install mediapipe 만 해 주면 mediapipe 기능을 모두 사용할 수 있다.
설치 이후엔 솔루션 별로 사용 안내가 있어서 쉽게 보고 따라할 수 있다.
- Face Landmark Detection Guide
- Pose Landmark Detection Guide
- Hand Landmarks Detection Guide
대부분 mediapipe를 사용하여 위 3개의 솔루션을 가장 많이 사용하고 또 나도 사용 해 봤어서 위 3개의 가이드만 남겨뒀지만
https://ai.google.dev/edge/mediapipe/solutions/guide
위 링크에 모든 솔루션 별로 가이드가 있으니 원하는 솔루션의 가이드를 볼 수 있다.
또, 각 솔루션 별로 논문도 있으니 같이 보면 굉장히 도움이 된다.
Hand Detection : https://arxiv.org/pdf/1512.02325.pdf (BlazePalm: Hand Detection, SSD: Single Shot MultiBox Detecton)
Pose : https://arxiv.org/pdf/2006.10204.pdf (BlazePose: On-device Real-time Body Pose tracking)
Face Detection : https://arxiv.org/pdf/1907.05047.pdf (BlazeFace: Sub-millisecond Neural Face Detection on Mobile GPUs)
Face Landmark model : https://arxiv.org/pdf/1907.06724.pdf (Real-time Facial Surface Geometry from Monocular Video on Mobile GPUs)
attention mesh : https://arxiv.org/pdf/2006.10962.pdf (Attention Mesh: High-fidelity Face Mesh Prediction in Real-time)
Mediapipe를 사용한 pose estimation + holistic
간단하게 holistic이라는 pose + hand + face 이 3가지의 landmark를 동시에 같이 추적할 수 있는 예제 코드를 작성 후 결과물을 공유 하고자 한다.
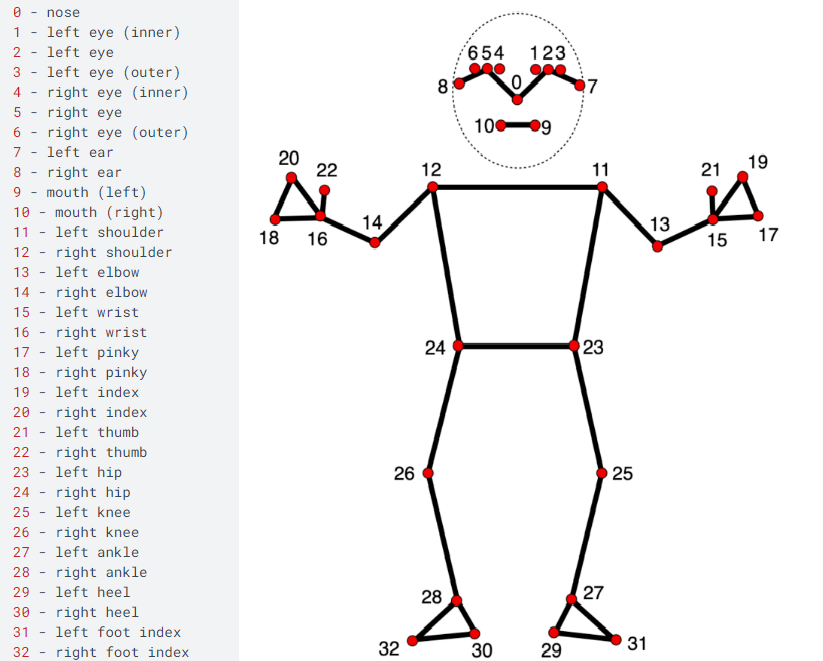
holistic에 사용 되는 pose, hand, face mesh에 사용 되는 keypoint 정보들은 아래와 같다.


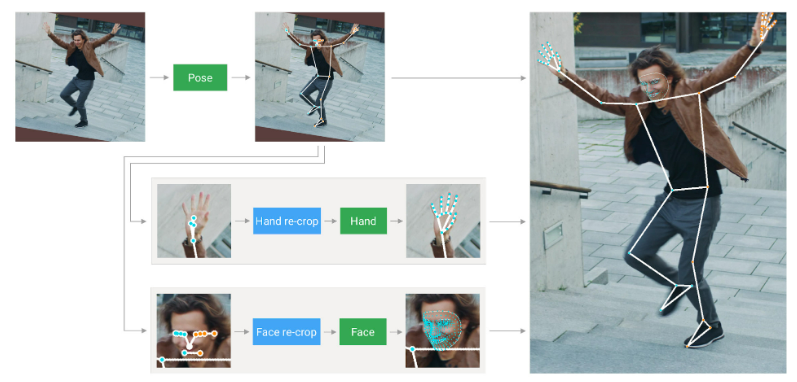
holistic은 먼저 pose detector와 subsequent landmark model을 사용하여 pose를 예측한다. 다음으로 예측 된 pose landmark를 사용하여 손과 얼굴에 대해 ROI를 자르고 task 별 face 및 hand landmark를 검출하는 모델을 적용한다. 마지막으로 모든 landmark를 pose model의 landmark와 병합하여 전체 543개(손 한쪽 당 21개, 얼굴 468개, pose 33), 혹은 그 이상의 landmark를 생성한다.

예제 코드
import cv2
import numpy as np
import mediapipe as mp
import time

# Initializing mediapipe pose class.
mp_holistic = mp.solutions.holistic

# Import drawing_utils and drawing_styles.
mp_drawing = mp.solutions.drawing_utils
mp_drawing_styles = mp.solutions.drawing_styles


cap = cv2.VideoCapture('./hypeboy_joo.mp4')
w = round(cap.get(cv2.CAP_PROP_FRAME_WIDTH))
h = round(cap.get(cv2.CAP_PROP_FRAME_HEIGHT))
fps = cap.get(cv2.CAP_PROP_FPS)
fourcc = cv2.VideoWriter_fourcc(*'DIVX')
out = cv2.VideoWriter('./holistic_result.avi', fourcc, fps, (w, h))

prev_time = 0

# Run MediaPipe Holistic and draw pose landmarks.
with mp_holistic.Holistic(
    static_image_mode=True, min_detection_confidence=0.5, model_complexity=2) as holistic:
    while cap.isOpened():
        success, image = cap.read()
        if not success:
            print("No Source !!!")
            break

        curr_time = time.time()

        # Convert the BGR image to RGB and process it with MediaPipe Pose.
        results = holistic.process(cv2.cvtColor(image, cv2.COLOR_BGR2RGB))

        # Draw pose landmarks.
        annotated_image = image.copy()
        mp_drawing.draw_landmarks(annotated_image, results.left_hand_landmarks, mp_holistic.HAND_CONNECTIONS)
        mp_drawing.draw_landmarks(annotated_image, results.right_hand_landmarks, mp_holistic.HAND_CONNECTIONS)
        mp_drawing.draw_landmarks(
            annotated_image,
            results.face_landmarks,
            mp_holistic.FACEMESH_TESSELATION,
            landmark_drawing_spec=None,
            connection_drawing_spec=mp_drawing_styles
            .get_default_face_mesh_tesselation_style())
        mp_drawing.draw_landmarks(
            annotated_image,
            results.pose_landmarks,
            mp_holistic.POSE_CONNECTIONS,
            landmark_drawing_spec=mp_drawing_styles.
            get_default_pose_landmarks_style())

        sec = curr_time - prev_time
        prev_time = curr_time

        fps = 1/(sec)

        fps_str = "FPS : %0.1f" % fps

        cv2.putText(annotated_image, fps_str, (0, 100), cv2.FONT_HERSHEY_SIMPLEX, 1, (0, 255, 0))

        out.write(annotated_image)

        cv2.imshow('MediaPipe Pose Result', annotated_image)
        if cv2.waitKey(1) & 0xFF == 27:
            break

cap.release()
out.release()
cv2.destroyAllWindows()mediapipe 설치만 제대로 했다면 문제없이 위 코드가 실행이 될 것이다.
위 코드를 적용한 결과물은 다음과 같다.
위 결과를 보면 알 수 있지만 굉장히 정확하다! 뒤로 돌아서도 손이 가려져도 대부분 frame이 놓치는 부분이 없이 추론이 되고 있다.
그리고 cpu 환경에서 동작했음에도 불구하고 생각보다 빠르다. 물론 10fps까지는 안나와주지만 gpu를 사용하면 더 빠르게 처리가 가능하지 않을까..
(pose estimation을 gpu로 실행할 수 있습니다 : https://github.com/google-ai-edge/mediapipe/issues/2041)
