ArUco marker는 검정색 테두리가 있는 이진 정사각형 이미지이다. 내부에 패턴은 마커 종류에 따라 다르다.
camera calibration 및 stitching을 위해 ArUco Marker가 거의 필수적으로 사용이 된다. 특히 pose estimation은 비전 분야에서 정말 많이 사용된다.
opencv를 사용하면 아래 marker 사전을 통해 쉽게 ArUco marker를 생성하고 detection하는 코드를 작성할 수 있다.
# define names of each possible ArUco tag OpenCV supports
ARUCO_DICT = {
	"DICT_4X4_50": cv2.aruco.DICT_4X4_50,
	"DICT_4X4_100": cv2.aruco.DICT_4X4_100,
	"DICT_4X4_250": cv2.aruco.DICT_4X4_250,
	"DICT_4X4_1000": cv2.aruco.DICT_4X4_1000,
	"DICT_5X5_50": cv2.aruco.DICT_5X5_50,
	"DICT_5X5_100": cv2.aruco.DICT_5X5_100,
	"DICT_5X5_250": cv2.aruco.DICT_5X5_250,
	"DICT_5X5_1000": cv2.aruco.DICT_5X5_1000,
	"DICT_6X6_50": cv2.aruco.DICT_6X6_50,
	"DICT_6X6_100": cv2.aruco.DICT_6X6_100,
	"DICT_6X6_250": cv2.aruco.DICT_6X6_250,
	"DICT_6X6_1000": cv2.aruco.DICT_6X6_1000,
	"DICT_7X7_50": cv2.aruco.DICT_7X7_50,
	"DICT_7X7_100": cv2.aruco.DICT_7X7_100,
	"DICT_7X7_250": cv2.aruco.DICT_7X7_250,
	"DICT_7X7_1000": cv2.aruco.DICT_7X7_1000,
	"DICT_ARUCO_ORIGINAL": cv2.aruco.DICT_ARUCO_ORIGINAL,
	"DICT_APRILTAG_16h5": cv2.aruco.DICT_APRILTAG_16h5,
	"DICT_APRILTAG_25h9": cv2.aruco.DICT_APRILTAG_25h9,
	"DICT_APRILTAG_36h10": cv2.aruco.DICT_APRILTAG_36h10,
	"DICT_APRILTAG_36h11": cv2.aruco.DICT_APRILTAG_36h11
}딕셔너리 key 값에 따라 마커 내부의 패턴이 달라지며, 사이즈들도 다 다르게 생성할 수 있다.
1. ArUco marker Generation
Type = 'DICT_5X5_100'
id = 2

# load the ArUCo dictionary
arucoDict = cv2.aruco.getPredefinedDictionary(ARUCO_DICT[Type])

# tag on the output image
print("[INFO] generating ArUCo tag type '{}' with ID '{}'".format(Type, id))
img_size = 500

marker_img = cv2.aruco.generateImageMarker(arucoDict, id, img_size)
cv2.imwrite('/mnt/f/aruco_marker/makers/' + Type + '_' + 'id_' + str(id) + '.jpg', marker_img)

plt.imshow(marker_img)
plt.show()위 코드를 실행하면 다음과 같은 마커를 얻을 수 있다.

여기서 type과 id를 변경하면 안에 패턴이 다른 모양으로 생성되어 출력된다.
2. ArUco marker Detection
Type = 'DICT_7X7_1000'

print("[INFO] loading image...")
image = cv2.imread('./example2.jpg')
# image = imutils.resize(image, width=600)

print("[INFO] detecting '{}' tags...".format(Type))
arucoDict = cv2.aruco.getPredefinedDictionary(ARUCO_DICT[Type])
arucoParams = cv2.aruco.DetectorParameters()
(corners, ids, rejected) = cv2.aruco.detectMarkers(image, arucoDict, parameters=arucoParams)
print("IDS : ", ids)

# verify *at least* one ArUco marker was detected
if len(corners) > 0:
	# flatten the ArUco IDs list
	ids = ids.flatten()

	# loop over the detected ArUCo corners
	for (markerCorner, markerID) in zip(corners, ids):
		# extract the marker corners (which are always returned in top-left, top-right, bottom-right, and bottom-left order)
		corners = markerCorner.reshape((4, 2))
		(topLeft, topRight, bottomRight, bottomLeft) = corners

		# convert each of the (x, y)-coordinate pairs to integers
		topRight = (int(topRight[0]), int(topRight[1]))
		bottomRight = (int(bottomRight[0]), int(bottomRight[1]))
		bottomLeft = (int(bottomLeft[0]), int(bottomLeft[1]))
		topLeft = (int(topLeft[0]), int(topLeft[1]))

		# draw the bounding box of the ArUCo detection
		cv2.line(image, topLeft, topRight, (0, 255, 0), 2)
		cv2.line(image, topRight, bottomRight, (0, 255, 0), 2)
		cv2.line(image, bottomRight, bottomLeft, (0, 255, 0), 2)
		cv2.line(image, bottomLeft, topLeft, (0, 255, 0), 2)

		# compute and draw the center (x, y)-coordinates of the ArUco marker
		cX = int((topLeft[0] + bottomRight[0]) / 2.0)
		cY = int((topLeft[1] + bottomRight[1]) / 2.0)
		cv2.circle(image, (cX, cY), 5, (0, 0, 255), -1)

		# draw the ArUco marker ID on the image
		cv2.putText(image, str(markerID), (topLeft[0], topLeft[1] - 15), cv2.FONT_HERSHEY_SIMPLEX, 1.5, (0, 255, 0), 3)
		print("[INFO] ArUco marker ID: {}".format(markerID))

	plt.imshow(image)
	plt.show()
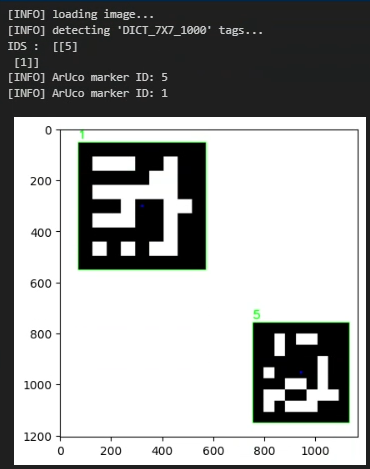
여러 이미지로 실행 해 본 결과 마커들이 이미지 가장자리에 빠짝 붙어있으면 전혀 인식을 못한다. 최소한의 간격을 두고 마커가 있어야만 인식을 하더라.
위 결과처럼 마커의 고유 ID가 인식이 되는 것을 볼 수 있다.
3. Pose Estimation
이 코드는 카메라 고유 값들을 알아야만 정확하게 축을 측정할 수 있어서 결과물이 정확하진 않다.
GitHub - GSNCodes/ArUCo-Markers-Pose-Estimation-Generation-Python: Estimating pose using ArUCo Markers
Estimating pose using ArUCo Markers. Contribute to GSNCodes/ArUCo-Markers-Pose-Estimation-Generation-Python development by creating an account on GitHub.
github.com
aruco_dict_type = ARUCO_DICT['DICT_7X7_1000']
calibration_matrix_path = '/mnt/f/aruco_marker/calibration_matrix.npy'
distortion_coefficients_path = '/mnt/f/aruco_marker/distortion_coefficients.npy'

k = np.load(calibration_matrix_path)
d = np.load(distortion_coefficients_path)
print('k : ', k, 'd : ', d)

'''
frame - Frame from the video stream
matrix_coefficients - Intrinsic matrix of the calibrated camera
distortion_coefficients - Distortion coefficients associated with your camera

return:-
frame - The frame with the axis drawn on it
'''

print("[INFO] loading image...")
frame = cv2.imread('/mnt/f/aruco_marker/makers/example2.jpg')
gray = cv2.cvtColor(frame, cv2.COLOR_BGR2GRAY)
arucoDict = cv2.aruco.getPredefinedDictionary(ARUCO_DICT[Type])
arucoParams = cv2.aruco.DetectorParameters()


corners, ids, rejected_img_points = cv2.aruco.detectMarkers(gray, arucoDict, parameters=arucoParams)

# If markers are detected
if len(corners) > 0:
    for i in range(0, len(ids)):
        # Estimate pose of each marker and return the values rvec and tvec---(different from those of camera coefficients)
        rvec, tvec, markerPoints = cv2.aruco.estimatePoseSingleMarkers(corners[i], 0.02, k, d)
        # Draw a square around the markers
        cv2.aruco.drawDetectedMarkers(frame, corners)

        # Draw Axis
        cv2.drawFrameAxes(frame, k, d, rvec, tvec, 0.01)    # drawFrameAxes는 opencv 독립 모듈이라 aruco에 없음!

plt.imshow(frame)
plt.show()
calibration_matrix_path = '/mnt/f/aruco_marker/calibration_matrix.npy'
distortion_coefficients_path = '/mnt/f/aruco_marker/distortion_coefficients.npy'
이 두파일은 카메라의 고유값들이라 촬영 기기마다 다르다. 따라서 아무 마커로 인식을 하게 되면 위 결과처럼 축들이 정확하지 않게 측정이 된다. (아예 엉뚱한 곳에서 축이 생성되기도 함.)
이 마커를 사용하면 카메라 stitching은 물론이고 claibration도 쉽게 할 수 있다!! 정말 유용했음!
